Master the Art of Homemade Butter with Michelin Chef Adam Byatt
Imagine a golden slab of butter, rich and creamy, melting luxuriously over warm bread. Now imagine creating that masterpiece yourself, from a single, humble ingredient. Sounds like a chef's secret, doesn't it? Well, Michelin-starred chef Adam Byatt of London's acclaimed Trinity restaurant is here to demystify the process, proving that making exquisite, one-ingredient butter at home is not only achievable but surprisingly simple.
For decades, butter has been a cornerstone of culinary excellence, from the revered artisans of Brittany, France, to the simplest home kitchens. While fine dining establishments often source the most exquisite, often expensive, commercial butters, Chef Byatt, with his 35 years in the restaurant business and a knack for translating complex techniques for home cooks via his popular online tutorials, challenged himself: could he produce a superior, cost-effective butter using just one primary ingredient?
The answer, as you'll discover, is a resounding yes. This comprehensive guide, inspired by Byatt's expert approach, will walk you through how to make butter one ingredient – primarily cream – transforming it into a spread that rivals the best money can buy. Get ready to elevate your culinary game and impress everyone at your table.
The Secret Ingredient: Unveiling Adam Byatt's Foundation
At the heart of any exceptional butter lies its foundation: the cream. Chef Byatt emphasizes this crucial point repeatedly, stating, "Your butter will never be better than the cream you start with." This isn't just a chef's adage; it's a fundamental truth that dictates the flavor, texture, and overall quality of your final product.
Choosing Your Cream Wisely
- High Fat Content is Key: Byatt specifically recommends using a local, high-quality double cream with at least 47% fat. Why such a precise percentage? The higher the fat content, the more butterfat is available to coalesce, resulting in a more efficient separation process and a richer, firmer butter. Lower fat creams, like single cream or half-and-half, contain too much water and not enough butterfat to yield a significant amount of usable butter.
- Quality Over Quantity: While "one ingredient" simplifies the process, it simultaneously elevates the importance of that single ingredient. Seek out cream from grass-fed cows if possible, as their diet often translates to superior flavor and a beautiful golden hue in the butter. Local dairies are often a fantastic source for fresh, minimally processed cream that hasn't traveled long distances. Consider the region, much like the famed butters of Brittany, France, where the terroir (environmental factors) contributes significantly to the unique flavor profile of dairy products.
- Sweet or Sour?: While Byatt starts with fresh, sweet cream, some home butter makers enjoy experimenting with slightly soured cream. Sour cream can impart a tangy, more complex flavor to the butter, akin to cultured butters found in specialty stores. However, for your first attempt at how to make butter one ingredient, following Byatt's lead with sweet cream is recommended to appreciate the pure, unadulterated flavor.
Remember, while we talk about "one-ingredient butter," fine sea salt is typically added *after* the butter has formed to season it, much like seasoning any other dish. The transformation from cream to butter, however, relies solely on that single dairy component.
Essential Tools for Your Homemade Butter Journey
You might imagine a Michelin-starred chef employing an array of specialized gadgets, but Byatt's approach to butter making is refreshingly accessible. The tools he uses are likely already in your kitchen, proving that sophistication lies in technique, not necessarily in extravagant equipment.
- Stand Mixer with Whisk Attachment: This is Byatt's workhorse. A stand mixer provides consistent, hands-free whipping power, crucial for the extended period required to break the cream. The whisk attachment introduces air and agitates the cream efficiently, speeding up the process significantly. While a stand mixer is ideal, a powerful hand mixer can also work, though it will require more effort and attention.
- Plastic Wrap: As the cream progresses through its stages, especially when the butterfat begins to separate from the buttermilk, splashing can become quite vigorous. A simple sheet of plastic wrap draped loosely over your mixer bowl can save you from a messy clean-up, allowing you to focus on the transformation without worry.
- Large Bowl of Ice Water: This is an often-overlooked but critical tool. Once your butter solids have formed, they need a thorough rinse in ice water. This process serves two main purposes: it helps to "wash" away any residual buttermilk, which can shorten the butter's shelf life and affect its flavor, and it firms up the butter, making it easier to handle and shape. Ensure you have plenty of ice on hand.
- Spatula or Scraper: Useful for scraping down the sides of the bowl during mixing and for working the butter in the ice water.
- Fine-Mesh Sieve or Colander: For straining the buttermilk from the butter solids.
- Container for Buttermilk: Don't discard that valuable byproduct!
For those without a stand mixer, a powerful blender or food processor can also be used. The principle remains the same: vigorous agitation to separate the butterfat. However, the exact timing and visual cues might differ slightly.
The Step-by-Step Transformation: From Cream to Culinary Gold
Now for the exciting part – watching a simple liquid transform into a rich solid. Here’s how to make butter one ingredient, following Byatt's simple yet effective method:
- Chill Your Equipment: For optimal results, place your stand mixer bowl and whisk attachment in the refrigerator or freezer for 15-20 minutes before you begin. Cold equipment helps keep the cream cold, which promotes quicker and more efficient whipping.
- Pour and Whip: Pour your high-quality, cold cream into the chilled stand mixer bowl. Begin whipping on medium-low speed, gradually increasing to medium-high. You'll observe the cream progressing through familiar stages:
- Soft Peaks: The cream will thicken and form soft, billowy peaks when the whisk is lifted.
- Stiff Peaks: Continue whipping, and the cream will become very firm and hold its shape. At this point, it's essentially whipped cream. If you wanted whipped cream, you'd stop here!
- Curdling: Keep whipping! The cream will begin to look grainy and clumpy, almost like cottage cheese. Don't panic; this is a good sign.
- Separation: Suddenly, and often quite dramatically, the fat solids (butter) will separate from the liquid (buttermilk). You'll see distinct yellow clumps of butter forming, swimming in a milky liquid. This is where the plastic wrap comes in handy to contain any splashes.
- Drain the Buttermilk: Once the butter has clearly separated, pour the contents of the mixer bowl through a fine-mesh sieve or colander placed over another bowl. Allow the buttermilk to drain thoroughly. Do not discard the buttermilk! This is genuine, fresh buttermilk – a fantastic byproduct for baking pancakes, biscuits, or fried chicken.
- Rinse the Butter: Transfer the butter solids into your large bowl of ice water. This step is crucial. Using clean hands or a spatula, knead and press the butter gently under the ice water. You'll see the water turn cloudy as more buttermilk is released. Drain the cloudy water and refresh the ice water. Repeat this process 3-4 times, or until the water remains clear after kneading. This thorough rinsing removes almost all residual buttermilk, which would otherwise cause the butter to spoil quickly and give it an off-flavor.
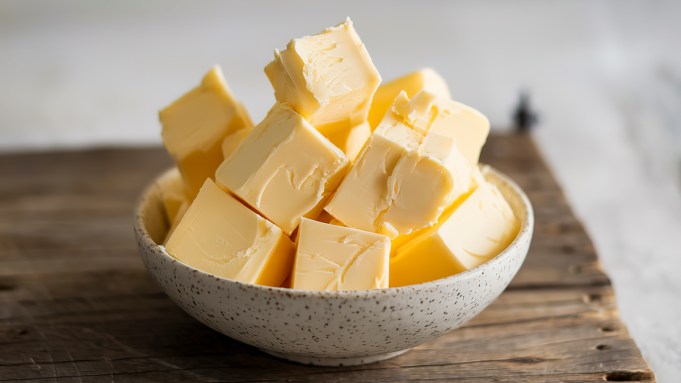
- Season and Form: Once the butter is clean and firm, remove it from the ice water and pat it dry with a paper towel. Transfer it to a clean bowl. Now is the time to season your butter. Chef Byatt recommends fine sea salt. Start with a pinch (about ¼ to ½ teaspoon per cup of cream used) and mix it in thoroughly. Taste a tiny bit to adjust seasoning as desired. Then, using your hands, a spatula, or a butter paddle, form the butter into your desired shape – a log, a block, or individual pats.
- Store: Store your freshly made butter in an airtight container in the refrigerator. It will last for about 1-2 weeks.
Beyond the Basics: Cost, Flavor & Creative Variations
Making your own butter isn't just about the novelty; it's about control, flavor, and potentially even savings.
Is it Cheaper?
Chef Byatt meticulously breaks down the cost of homemade versus store-bought butter, and while premium store-bought brands can be expensive, the initial outlay for high-quality cream might make you wonder. However, when considering the superior quality, freshness, and the valuable byproduct of buttermilk, the argument shifts. For a deeper dive into whether make your own butter is cheaper and better than store-bought, exploring the economics can be quite insightful. Often, the joy and unique flavor outweigh a slight cost difference.
Unparalleled Flavor
The taste of freshly churned butter is truly in a league of its own. It boasts a cleaner, brighter dairy flavor, a creamier texture, and a subtle sweetness that's often lost in mass-produced options. This freshness makes it ideal for spreading on toast, melting over vegetables, or finishing a sauce.
Creative Variations
Once you've mastered how to make butter one ingredient, the culinary world opens up to endless possibilities for compound butters. Simply knead additional ingredients into your freshly made butter before forming:
- Herbed Butter: Mix in finely chopped fresh herbs like chives, parsley, dill, or rosemary.
- Garlic & Herb Butter: Sautéed minced garlic and a mix of herbs are fantastic for steaks or garlic bread.
- Sweet Butters: A dash of cinnamon and honey, or maple syrup, creates a delightful spread for pancakes or sweet potatoes.
- Citrus Zest Butter: Lemon or orange zest adds a bright, aromatic lift, perfect for fish or pastries.
- Spiced Butter: A pinch of smoked paprika, chili flakes, or curry powder can add an exotic twist.
Conclusion
Chef Adam Byatt's guide to making butter from a single ingredient isn't just a recipe; it's an invitation to connect with your food on a deeper level. It dispels the myth that fine dining techniques are confined to professional kitchens, demonstrating that with a quality ingredient and a little patience, you can create something truly extraordinary at home. The process of transforming cream into luscious butter is not only satisfying but yields a product far superior to most store-bought alternatives.
So, gather your high-fat cream, your stand mixer, and prepare to embark on a delightful culinary adventure. Discover for yourself the simple magic of how to make butter one ingredient, and elevate your everyday meals with this homemade luxury.
